Monday, 3 August 2009
Monday, 20 July 2009
Hide & Seek Weekender 31st July - 2nd August 2009 at the Southbank Centre

"Head down to the Southbank Centre for the Hide&Seek Weekender, two and a half days of free social and pervasive games. Betray, argue and deduce with an evening of social games on Friday night. Film, follow, decipher, hide and hunt all day Saturday. And turn up on Sunday for a day of family-friendly games. We'll be filling the South Bank with argumentative bank robbers, Twittering spies, teleporting enemies, adventurous soft toys, player-generated music, and much more, so do come and play! Visit http://www.hideandseekfest.co.uk/2009programme to read about all the different games."
Spirowonder! Sunday 2nd August 11 - 5

Use the concrete pavements as your canvas around the Southbank Centre to create hypnotic patterns, your tools an ever-so-large spirograph, chalk and your imagination. Draw your own individual pattern or add to a pattern already drawn; see this explode and grow through the day. You can borrow a spirograph individually, but it's more fun and easier if you draw collaboratively.
Wednesday, 8 July 2009


Tuesday, 30 June 2009
Saturday, 20 June 2009
Life Cycle Garden - in process
After playing around with a few different designs we have chosen to go with the idea that gradually the arches will decay in form. Where the two sides cross over, the left hand side of the arch (on the outside of the path) will gradually fall towards the ground. We will place one side of the arch in front of the sleeper and the other side behind. We have bent steel rod as as fully sized template for each individual arch and also to act possibly as a center to the arch if we find that the cooper needs extra stability. 

Upcoming: Tate Take Over: Art of the Everyday

Release your inner artist at Tate Modern's summer fair. 3D Design students from Camberwell College of Arts have worked with Raw Canvas to put on an interactive fair inspired by Arte Povera, when 1970s artists used humble materials to make art. Each installation will respond to an aspect of the Arte Povera ethos and visitors are encouraged to help create unique artworks and take away their own souvenir of the experience.
Supported by the Peter Cruddas Foundation
Friday 26 June 2009 19.00–21.00 and Saturday 27 June 2009 14.00–17.00
Tate Modern Turbine Hall Bridge
Free, no bookings taken
Friday, 19 June 2009
Urban Hanging
I've been thinking of various little activities of playing and doing in London - as ways of interacting with someone and exploring unused or new uses for spaces.
Myself and Owen Hodgkinson are exploring London through 'Urban Hanging' which is simply the act of hanging upside down somewhere and watching people pass by. The outcome is mostly hysterics as people look very odd upside down, so far we have explored a few different spots of the Southbank. More exploring to do and an urban hanging map to come soon!
Tuesday, 26 May 2009
Grow It Together: Apothecary Arboretum

An initial prototype for a verticle garden which is a self sustaining eco-system which uses recycled
materials. It is practical for urban farming in condence urban spaces, but also acts as a living sculpture.
The verticle garden is built from reclaimed bamboo poles, recycled water bottles and concrete. The bamboo form was inspired by DNA double helix form, the bamboo harvests and disperses water among the planted bottles. The water bottles sit on the end of the poles, currently the bottles are cut open with plants growing out, in the next evolution we will explore using the bottles as small incuba
tors.

This is prototype was built for the Long Weekend at Tate Modern, as part of the House of Fairy Tales residency over the bank holiday weekend Friday 22nd - Monday 25th May 2009. It acted as a scene for the apothecary, placed together the structures form a mini risen garden forest.
One was also show at the Brompton Borders Secret Garden Festival, in the Car Park, 2 North Terrace. An old garage transformed into a secret garden, a family event celebrating 'creativity and play in he fine art of horticulure'.
This was designed and constructed in collaboration with Dimitri Launder, Tom Davies, Emma Payne, Ian Daniel, Owen Hodgekinson and myself. (Grow It Together)
Quicksilver Performance
I participated in six workshop sessions forming the third body of research with Lea Andersons dance and performance company The Cholmondeleys at Tate Modern, which explored public behaviourspace, artwork and function in the gallery through performance and mass movement.
In the taster session on the Turbine Hall Bridge we were introduced to walking collectively and measuring space through counting our steps, we were told to try and keep our posture quite upright and glaze ahead, walking purposefully through the space, the energy was intense, knowing the number of steps meant that we could tightly turn direction together. I loved the sense of connecting with the space through my body and the movements felt unforced so not to much like a performance.
The performance research had no fixed outcome, it was ongoing though out the gallery so there is no seated or fixed audience. The visitors were unaware as it was unannounced, visitors might catch a fleeting gimps of us and think that was odd, did I see that? Other times depending on our actions or the space our movements were more visible and visitors would look on in suspicion, follow us through the gallery, some even joining in especially when we moved fast counting our steps through the space.
There were about 20 performers overall, we split into three groups with one Cholmondeleys member as our group guide. Initially each group simultaneously created a rough sequence of behaviour in reaction to; the space, visitor’s behaviour and artwork throughout the collection displays of Level 3 Materials Gesture. Although all as individuals moving as a group we become one with out own logic, with no one in control we learnt quickly to sense each others presence and move together as a shoal of fish at times then dispersing and disappearing becoming a gallery visitor, then re-gathering and carrying on as a group. Similar to how to visitors together walk around for parts, look sparately at an artwork then come back to together to move on to another room.

Pablo Picasso Pose
Within our sequence; we observed and mimicked visitors looking poses subtly, at times playing a relay game between the group copying, someone copying a visitor. We reacted to the artwork physically either imagining there was a wire of current from the painting through to us or reacting to the painting through movement. In front of Pablo Picasso's The Studio 1955. I elongated by body trying to make myself as tall, stiff and calm as the person I saw in the bottom right (which is actually a sculpted head on a stall), holding this until someone
copied me in the relay. By shuffling back and forth in front of a painting we found our own individual comfortable position to view it from, through this I discovered artwork a had previously overlooked.

In front of Toby Ziegler’s “The Hedonistic Imperative” we imagined we were tracing the circles with a pencil on the end of our nose, this bit was so funny as our heads moved confidently in an odd jerk.

We explored extending moments of stillness; collectively pausing and looking upwards, in front of art works and architectural elements of the gallery.

Joseph Beuys "Lightning with Stag in its Glare"
Walking then stopping abruptly and looking at artwork for an extended time period from a distance, these moments were beautifully awkward and surreal, like a cattle grazing through the gallery. A group spread apart but together in a moment of stillness. By pausing long enough you passed an awkward stage into a calm appreciative still state, which we would snap out off and move on to repeat after a few steps.
We then translated the combination of sequences for each room to Level 3: Poetry and Dream, this was really interesting as we didn’t talk about what we would do but as a group moved through the gallery through our sequence choosing how to m
ove spontaneously. Some of the best moments were accidental and coincidental, as group we paused collectively spread out in room 6 with Joseph Beuys “Lightning with Stag in its Glare” for a really extended moment of time and Ragnal from The Chomleys herd the gallery assistant say “beautiful” in reaction. On the same night we were running through our sequence as the galley was closing, we had collected to lean backwards and peer over our shoulders through the doors into the next room, coincidently as the gallery assistant was closing the door. Oo beautiful.

first whirlpool practice
We experimented with all of us flocking to a space, as each group finished their sequences through Level 3 we planed to meet on the concourse to form a whirlpool of people and exit slowly down the stairs. Unaware of how long each group would take the whirlpool grew slowly, as it sped up we accidently wrapped a group of school girls which was funny, as they were squawking “What’s going on?!”
In the Turbine Hall we explored inappropriate and contrasting behaviour of visitors. Observing that visitors casually walk, talk, glance around and up, sit, take photos and generally walk diagonally across the ramp. We behaved as if we were in the gallery, peering and examining invisible artworks at eye height on the walls, walking vertically and horizontally in contrast to diagonally and adjusting our walking speed to casual cruising slow gallery pace and a fast pace. While walking in the group we used code words to change our direction and movements such as; shop, stately home, disperse, linear and backwards. If someone said “linear” we would quickly disperse like a bomb in straight lines then form back together as a group.
One night we swopped group leaders and they gave us a tour of the other groups movements instructing as “You begin by looking at this painting. You stop and walk 10 paces to the wall. You are sucked into the paint and start twitching from your shoulders down to your knees”. This was exciting as we were being told how to move though the gallery and physically interact with the artwork. Instead of a content and context guide - a physical guide not being told to do something but being told you are doing something, so you do it.
Monday, 25 May 2009

Sunday, 17 May 2009
Dulwich Fesitval - Open House weekend
Make It Local - an exhbition by second year 3D design students as part of Dulwhich Festival Artist Open House weekends
I spirographed a little on the patio by myself, collaboratly with some children (picture below) and others carried on with the spirograph/drew some spirograph inspired patterns to.


I exhibited my Street Drawings short film and I put the spirograph outside on the patio for people to pick up.
I spirographed a little on the patio by myself, collaboratly with some children (picture below) and others carried on with the spirograph/drew some spirograph inspired patterns to.


Monday, 4 May 2009
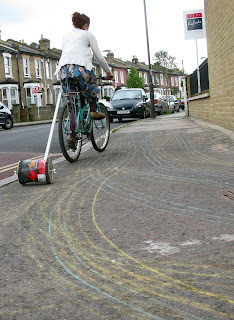
Street Drawings - Short film
Short film of a few of my street drawings with the bike tools. First site with chalk tied to rake, second and third with the rolling paint tin with holes drilled in to allow coloured sand to trail out.
Friday, 1 May 2009

Wednesday, 29 April 2009

Monday, 20 April 2009
London Wildlife Trust's - Life Cycle Garden
This year the London Wildlife are showing there Life Cycle Garden at RHS Hampton Court Flower Show. It is a sustainable garden that explores the natural cycles that are essential to successful wildlife and climate friendly gardening. It is a place where everyday objects come to life and all the stages in plant life cycles are celebrate, including death and decay.
+Elaine+Hughes.jpg)
The design illustrates chronological cycles of life, and emphasis the fundamental importance of sustainability. It finds new uses for material that have been discarded, reclaiming and recycling them into wildlife and climate friendly habitats.
The garden supports the London Wildlife Trust's Garden for a Living London Campaign, which highlights the importance of the capital's gardens for wildlife and people. In urban areas especially, gardens will help reduce the impacts of climate change.
The Life Cycle garden design by Elaine Hughes
Together with Owen Hodgkinson we will be designing and making a trellis for the garden, to act as sculpture feature physically representing the cycle and decay of the life cycle, a light feature and a plant support.
London Wildlife Trust: www.wild.london.org.uk
Living London Campaigne: www.wild.london.org.uk/gardening
Centre for Wildlife Gardening: 28 Marsden Road, Peckham, London, SE15 4EE
Thursday, 26 February 2009
some of the Harmonograph videos on youtube
possted by: eventhorizon53, 11 January 2008
"built this harmonograph, in part for the Art Faculty show at the college where I teach photography. I wanted it to be made primarily of wood, so I hollowed out redwood blocks that I filled with lead for the weights."
post comments by eventhorizon53:
- The 2 main Pendulums have varying weights and Radi ans swing perpendicular to one another, which creates varying frequencies which are transfered to the pen by arms. The pen rest on paper that is on a table on a third pendulum which rest on a gimble allowning it to rotate adding a third frequency to the resulting Lissajous diagram. The paper is held in place by a small amount of rubber cement on the corners of the table.
- Sure, the bearings are sealed roller bearings that I bought on Ebay. 5/8 of an inch diameter and 3/16 hole. The gimble I made by cutting donut out of the table and used a drill press to get the two holes perfectly in line
posted by johnmoriarty, 21 September 2007
"This is a Harmonograph that was made for the teamYES* exhibition; Experiments in the Field of Fun, in Monster Truck Gallery, Dublin."
posted by: K1Models, 12 November 2007
Automatic drawing machine using pendulums. Prototype version for proof of concept
posted by: mandobaron, 02 June 2006
Wednesday, 25 February 2009
Theo Jansen
Theo Jansen is a Dutch artist who since 1990 has been building walking kinetic sculptures that he calls a new form of life. His "Strandbeests" walk the coastline of Holland, feeding on wind and fleeing from water.

The initial generations were bulky and rudimentary they have evolved to adapt and react to their environment on the beaches. “Over time, these skeletons have become increasingly better at surviving the elements such as storms and water and eventually I want to put these animals out in herds on the beaches, so they will live their own lives.” Theo’s more sophisticated creations are able to detect once they have entered the water and walk away from it, and one species will even anchor itself to the earth if it senses a storm approaching.

They are intricately constructed of wood, plastic tubes – electrical conduit a purpose design electrical piping systems used for protecting and routing electrical wiring. “I make skeletons that are able to walk on the wind, so they don’t have to eat.” The creatues have stomachs consisting of recycled plastic bottles that store air, captured by gossamer (light, delicate) wings that flap and pump air a high pressure to us in the absence of wind, these to power the many spindly legs.
www.ted.com
Theo Jansen: the art of creating creatures
March 2007
AMAZING!
Thursday, 19 February 2009
Harmonograph - wikipedia
A harmonograph is a mechanical apparatus that employs pendulums to create a geometric image. The drawings created typically are Lissajous curves, or related drawings of greater complexity. The devices, which began to appear in the mid-19th century and peaked in popularity in the 1890s, cannot be conclusively attributed to a single person, although Hugh Blackburn, a professor of mathematics at the University of Glasgow, is commonly believed to be the official inventor.[1]
A simple, so-called 'lateral' harmonograph uses two pendulums to control the movement of a pen relative to a drawing surface. One pendulum moves the pen back and forth along one axis and the other pendulum moves the drawing surface back and forth along a perpendicular axis. By varying the frequency of the pendulums relative to one another (and phase) different patterns are created. Even a simple harmonograph as described can create ellipses, spirals, figure eights and other Lissajous figures.
More complex harmonographs incorporate three or more pendulums or linked pendulums together (for example hanging one pendulum off another), or involve rotary motion in which one or more pendulums is mounted on gimbals to allow movement in any direction.
Tuesday, 3 February 2009
Red Rolling Skit in the Snow
I put some red acrylic into tin with three holes drilled
I trailed it around for a while in the snow, filmed by Chloe
(I wiped the paint off the roof afterwards - no damage done)
After making a trail, I started to repeatedly go over one area - the same motion as if I was sweeping but having the reverse affect splattering red paint all across the ground.

I then wanted to clear some of that paint which was outside our door to disguise my trail, I placed it in the road in a line down the middle - contrast of the white and red snow against the mulsh, would be interesting to do this down a large section of road
Then I used up the last of the snow in the pot I had used for mixing the paint and used this as a mould.

I started to clean out the tin outside in our garden with water and carried on spreading the red- as, I was doing it I thought it would of been more visually striking, if i filled in the lower part all in red

Monday, 2 February 2009
second version of attachment
The previous attachment worked alright, but although I strengthened the metal by putting bends in it is still to flimsy and the fixed two points of connecting to my bike mean that it doesn't turn the corner to well. So I looked around my Dads yard for a bit and found a straight sqaure box piece of steel, which again I have ajusted so that both attachments can fit on. (and more when I've made them)
After coming up with various ways of creating a pivit, we found this to attach to the back of my rack. I then cut the metal down using the hand held grinder with a thin Kerf cutting blade and sanded down the edges, drilled the hole and bent it in the vice to the right angle.

Dad suggested that we bend the rod in the Hydrolic Press which we did a bit tested it and bent it a bit more

Frame for Tin Attachement - attachment that I can put around the tins, made from alluminium, so was easy to bend and cut. Pot rivited joint. Again attached with bolt, spring washer and butterfly screw.

Tin Attachement

Rake Attachement

Attachment, Tin Roller and Rake
I cut an old bicycle tyre down

measured the width of the tyre and dived the rest of the width on the tin to drill 3 lines of holes on, I used this strap to get a rough straight line, I then pot riveted the tyre to the can

found the center of the bottem and the lid of the tin with this set square (very useful)

cut some threaded rod to length and placed two bolts locked these off and a washer at both the bottom and the top of the tin inside

I then drilled a hole to fit a bung in the lid and hammered the lid on, fixing a washer and bolt tight to the tin

Test outside putting dry sand into the tin worked well, sand came out as a pretty much constant line. Attachment followed the movement of the bike pretty well, bit cumbersome round the corners

placed four bolts on the threaded rod either side of the tin so that the attachment doesn't get caught

- Attachment, attaches to the side of my bike rack as it can quickly be attached andd detached with the butterfly screws
- can also be folded down by unscrewing the black tube which keeps the two rods either side parallel
- bends in metal to try and keep it more rigid
I made the attachement so I could utilise it for other extensions.
I found an old cast aluminium rake, I bent the metal at the end of the attachment and drilled holes through this and the rake to attach it with four bolts and butterfly screws


measured the width of the tyre and dived the rest of the width on the tin to drill 3 lines of holes on, I used this strap to get a rough straight line, I then pot riveted the tyre to the can

found the center of the bottem and the lid of the tin with this set square (very useful)

cut some threaded rod to length and placed two bolts locked these off and a washer at both the bottom and the top of the tin inside

I then drilled a hole to fit a bung in the lid and hammered the lid on, fixing a washer and bolt tight to the tin

Test outside putting dry sand into the tin worked well, sand came out as a pretty much constant line. Attachment followed the movement of the bike pretty well, bit cumbersome round the corners

placed four bolts on the threaded rod either side of the tin so that the attachment doesn't get caught

- Attachment, attaches to the side of my bike rack as it can quickly be attached andd detached with the butterfly screws

- can also be folded down by unscrewing the black tube which keeps the two rods either side parallel
- bends in metal to try and keep it more rigid

I made the attachement so I could utilise it for other extensions.
I found an old cast aluminium rake, I bent the metal at the end of the attachment and drilled holes through this and the rake to attach it with four bolts and butterfly screws


Friday, 30 January 2009
first test of Spirograph

after chatting and playing with it I think this is what I need to change:
- the angle of the cogs - more rounded and equal top and bottom
- place the outer circles further inwards as the holes towards the center work much better due to the pressure being applied...
design a few different ones and cut them at a smaller scale in card, (this one was in 5mm plywood) to test which works best and to try layering some together as I think this will help to
what other medium to draw with? - smaller chalk sticks/ graphite
smaller holes that slot in to the existing ones? so same spirograph can be used for multiple materials to draw with
Thursday, 29 January 2009
Redrawring the Spirograph in Illustrator
After getting to uni at for 8:30!!!!! as Neil had kindly said he would squeeze me on to the lazer cutter.I found that my VectorWorks file just wouldn’t work! –wouldn’t convert, save or open as an Illustrator file.
Mike suggested a DXF file this seemed to work but still wouldn't open on another the computer
So I embarked on redrawing it in Illustrator which I don’t really know how to use –asked one of the technicians – is there a way of putting the shape on a line and bending it around a circle? no but suggested this way
Effect > Distort and Transform > Transform
 Which allows you to select a shape, chose the number of copies, which point to rotate from and chose the degree of rotation. Also Scale - which will rotate the shape into a spiral and Move - spacing etc. But after fiddling about with this for a while I couldn't get it to work.
so the technician Kay showed me this helpful website: www.illustrator-brushes.com - which has a handful of tutorials for Illustrator brushes (also sister website for Photoshop brushes)
Select rotation tool (if you hold shift you get set angles) (slect object press enter brings up rotate panel so you can enter in angle).
What I did:
- drew a circle found center (using co-ordinatates of page) and marked with horizontal and verticle line
- placed the tooth so that end points touched the edge of the circle(which I had also made largr then my orginal VectorWorks Scale up)
- by moving the rotation point away from the center of the tooth to center of the circle
- press Alt key, trial and test to find right angle to join the end points of the tooth, select copy
- shortcut key to duplicate copyied object Apple and D
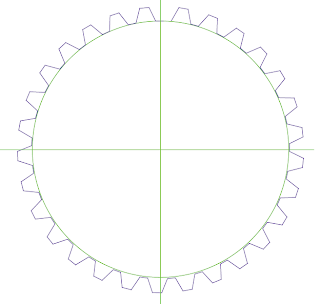
This first attempt of the middle circle didn't join up, I think that this may of bean becuase of how iI orginally placed the tooth on the circle and then copied it
Outer circle:
Inner Cirlce:
Middle Circle:
Smaller Circle:
Placing holes for circle
 circle the average diameter of my chunky chalk/crayon 3 cm
draw sprial and placed circles on spiral, then deleted center lines and spiral
finished Illustrator drawring

size: 70 cm by 70cm
Outer circle: d rotation: 5
Inner circle: d rotation: 6.8
Middle circle:
Smaller middle circle:
Site Specific Spirograph?
I was thinking about this one little area near Lidils, which I always find interesting as there are so many built in circles - the double mine roundabout and with in the little park:


Subscribe to:
Comments (Atom)
